Custom NFT (ERC721)
MetaKeep NFT APIs provide limitless possibilities to support your NFT use case. If you have a special NFT use case not supported by MetaKeep NFT APIs, you can write your own NFT(ERC721) contract and run it on MetaKeep's Lambda infrastructure.
Your custom ERC721 contract will run as a first-class citizen on MetaKeep, receiving the same privileges our first-party contracts do(NFT and Coin contracts), in terms of the ability to scale (to ~65K peak TPS), resiliency (AI-powered transaction failure recovery, Probabilistic gas price management) and without gas fee (for you, your customers, and their users)- i.e., deferred billing.
In this tutorial, we will discuss deploying your custom ERC721 smart contract on MetaKeep Lambda Infrastructure. The custom contract only allows minting to whitelisted users and will only mint at most one token to a user.
You can find an end-to-end working demo here.
Getting started with Custom ERC721 Contract
The first step is to get an API key. To do so, sign up here.
Step 1: Inherit MetaKeep Lambda Base Contracts to your Custom ERC721 contract
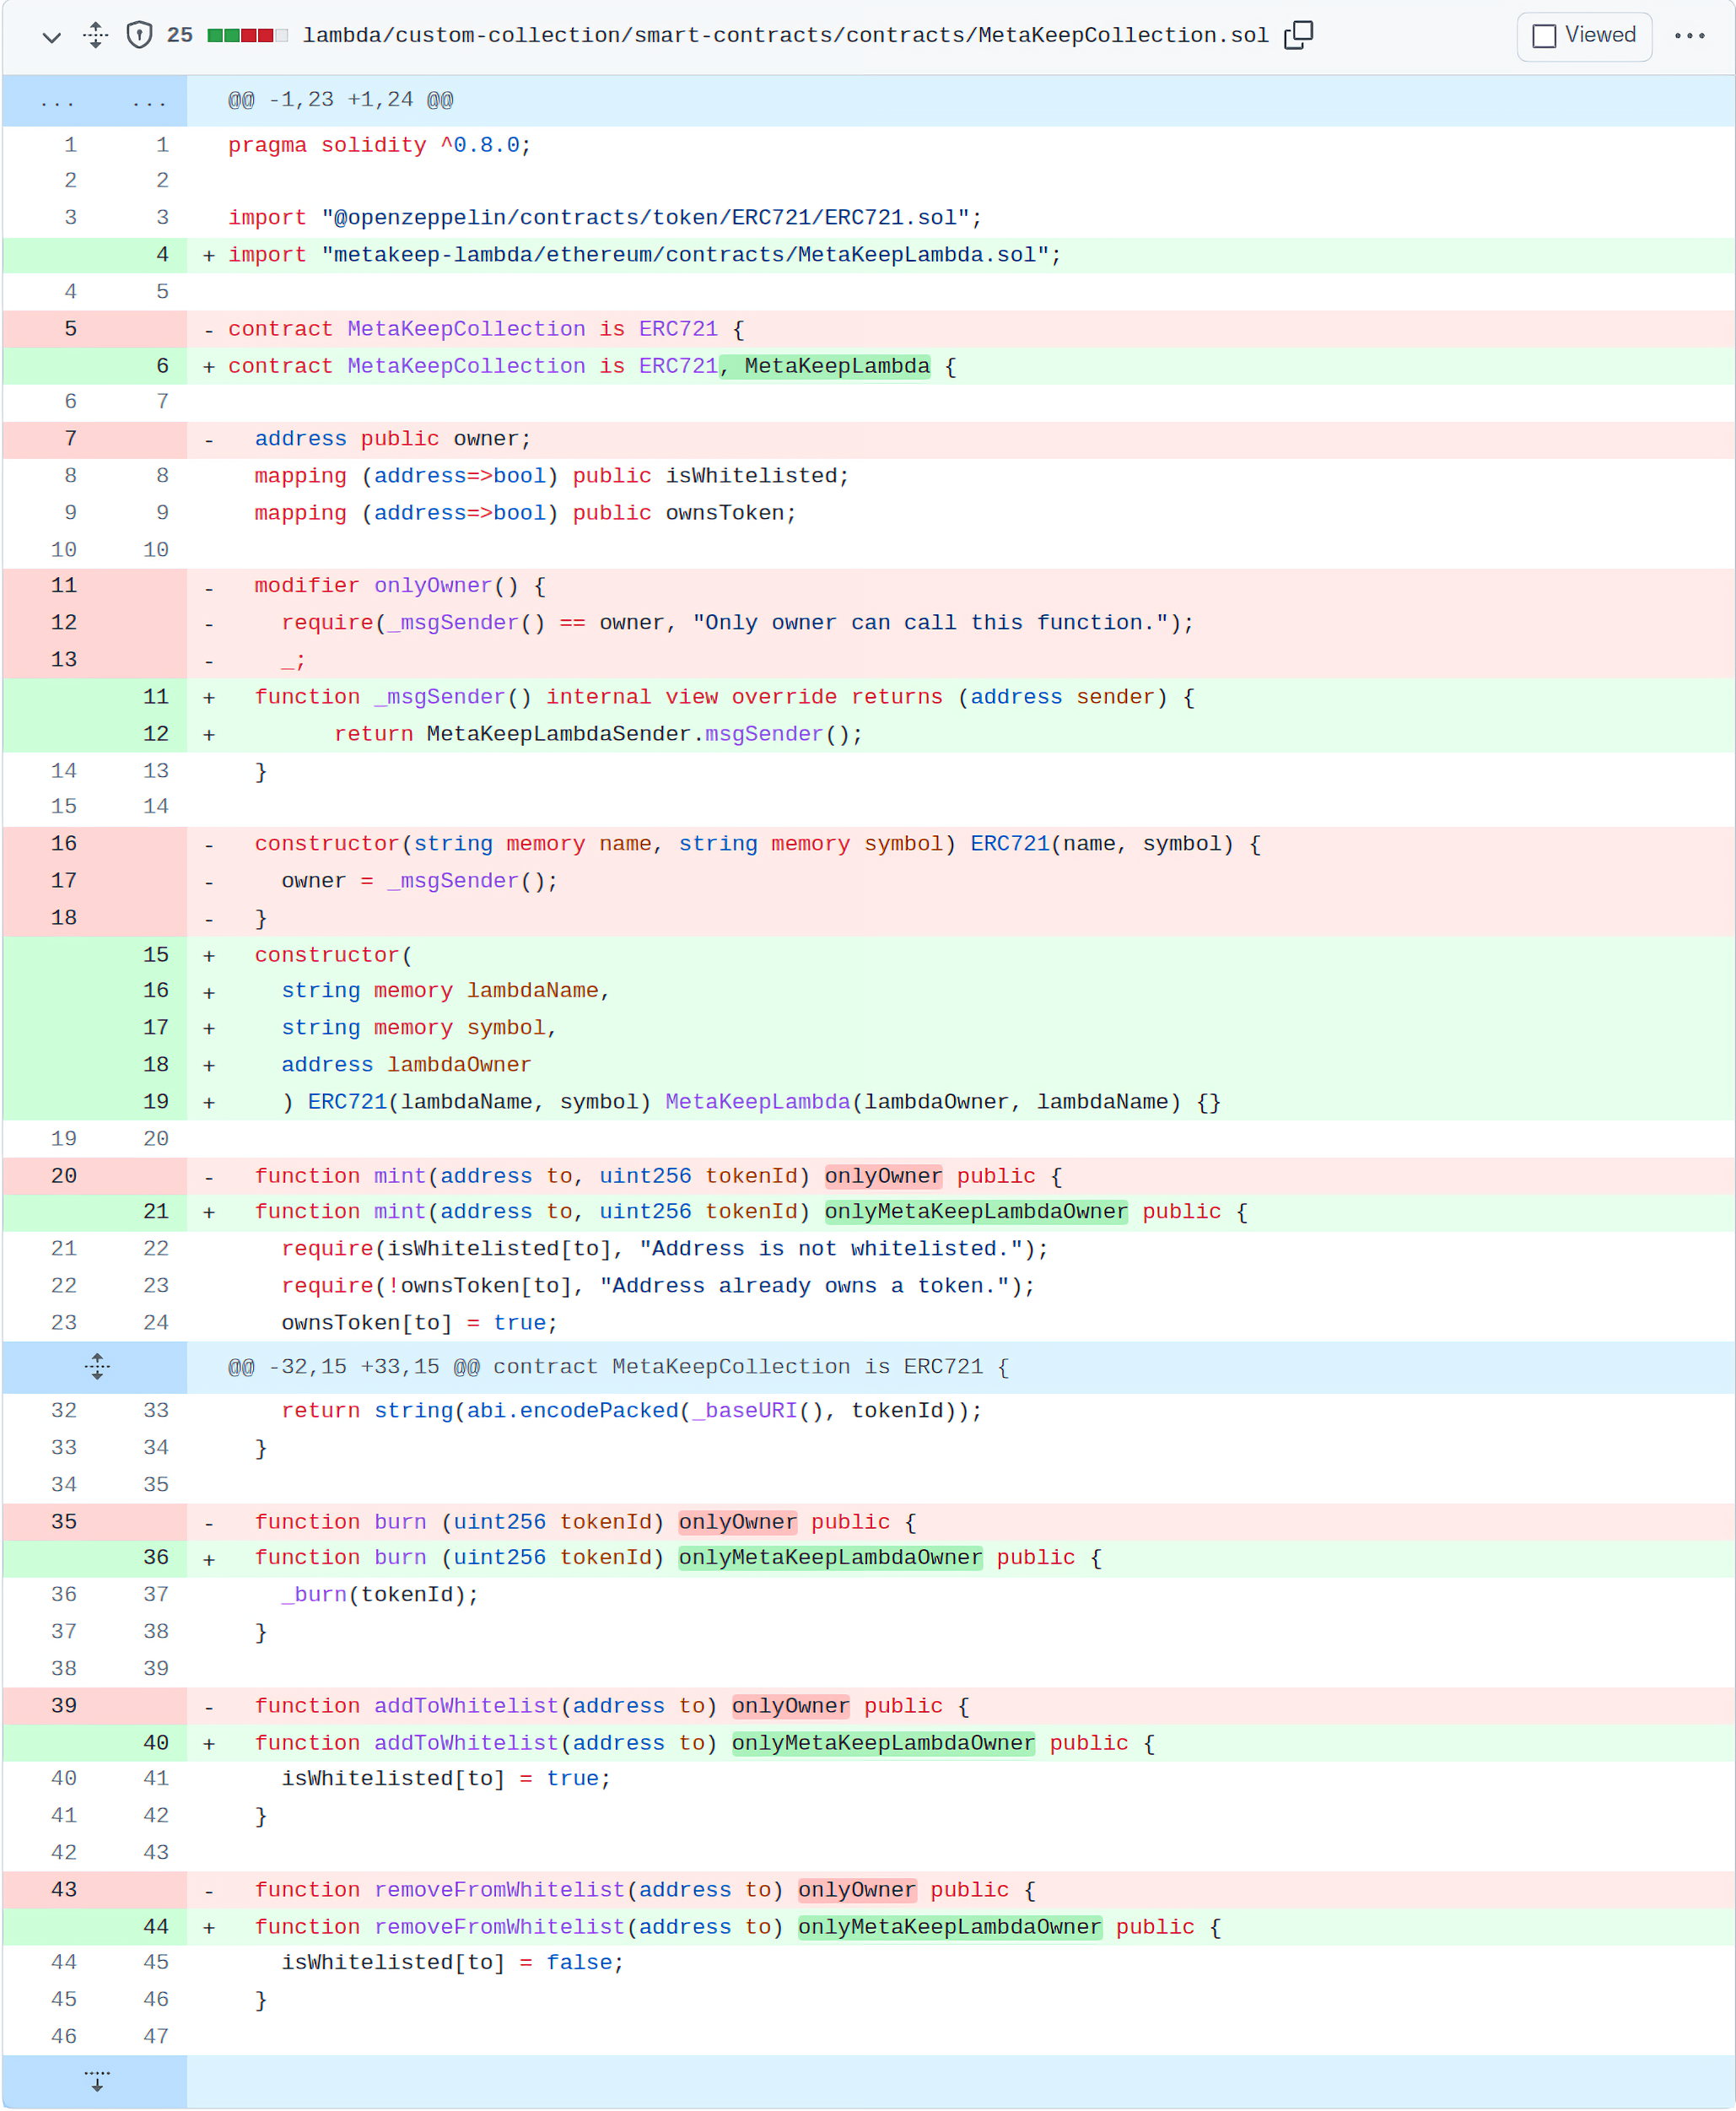
MetaKeep Lambda base contracts handle all the logic related to gasless transactions, access control, and a lot more. Follow the steps below to integrate it with your custom ERC721 contract:
-
Install MetaKeep Lambda base contracts and inherit
MetaKeepLambda.sol.npm install metakeep-lambda -
Update Constructor: The constructor expects 2 required parameters, lambdaOwner and lambdaName. LambdaOwner is the developer's address that you can get from getDeveloperWallet API.
-
Add
_msgSender()function. This function ensures that we read the correct sender for gasless transactions. -
Replace
msg.senderwith_msgSender(). -
Use the
onlyMetaKeepLambdaOwnermodifier to guard the access to functions that only the contract owner should be able to call. For e.g. you will use this formintandburncalls.
Below is an example of how the custom erc721 contract was modified to achieve this. After these minor updates, your custom ERC721 contract would run as first-class citizens on MetaKeep, receiving the same privileges our first party smart-contracts do(NFT and Coins contracts).
Step 2: Get the ABI, bytecode, and the Constructor Arguments of your smart contract
Once you have compiled the custom ERC721 contract in lambda/custom-erc721/smart-contracts directory, a new folder, artifacts, will be created from which you can easily fetch the ABI and Bytecode of your custom ERC721 contract.
Step 3: Create a POST request to the app/lambda/create API
app/lambda/create APILet's construct the request body using all the information collected in the previous step, as shown below.
{
    "constructor" : { args : [lambdaOwner, lambdaName] },
    "abi" : < ABI >,
    "bytecode" : <Bytecode>
}
Step 4: Call the app/lambda/create API to deploy your custom ERC721 contract
app/lambda/create API to deploy your custom ERC721 contractTo deploy, make a POST request to the API. You need to use the API KEY and the Idempotency-Key. Here is what the request will look like:
const fetch = require('node-fetch');

const url = 'https://api.metakeep.xyz/v2/app/lambda/create';
const request_body = {
    "constructor" : { args : [lambdaName,..., lambdaOwner]},
    "abi" : < ABI >,
    "bytecode" : <Bytecode>

}
const options = {
  method: 'POST',
  headers: {
    Accept: 'application/json',
    'Content-Type': 'application/json',
    'x-api-key': <API_KEY>,
     ‘Idempotency-Key’: <IDEMPOTENCY_KEY>
  },
  body: JSON.stringify(request_body)
};

fetch(url, options)
  .then(res => res.json())
  .then(json => console.log(json))
  .catch(err => console.error('error:' + err));
This is what you should see as the response from create API
{
  status: 'QUEUED',
  transactionId: '1f424819-4ddc-4bcb-9054-ca75b2719f9b',
  transactionHash: '0x9b304e368e0d5d6398c6dd6ad5e216bfc80fefebb99897e8238633ef1d957b7a',
  transactionChainScanUrl: 'https://mumbai.polygonscan.com/tx/0x9b304e368e0d5d6398c6dd6ad5e216bfc80fefebb99897e8238633ef1d957b7a',
  lambda: '0x17192E38Db788a15432149C93101C6cB040dE7C2'
}
Note the lambda field in the responseThe lambda field gives you the address of your custom ERC721 contract. Keep the address recorded because it will be used for lambda invocation (You can always get the list of your deployed lambdas using the list lambdas API).
Running the Demo
You can find an end-to-end working demo here. Follow these steps to run the demo:
Step 1: Compile the custom ERC721 contract
Navigate to the lambda/custom-erc721/smart-contracts directory. Then, run the command:
npm install
npx hardhat compile
To run contract unit tests, run the following command:
npx hardhat testStep 2: Update .env file
.env fileUpdate the API key in the .env file.
Step 3: Deploy the contract
Navigate to the lambda/custom-erc721/scripts directory. Then, run the command:
npm install
npm run create
The script will deploy the lambda, and wait for the transaction mining. You will see the created lambda address in the output of the script.
Step 4: Whitelist the user and mint token
Update the .env file with the Lambda address from the previous step, and the user email who you want to whitelist and issue tokens. Then, run the command:
npm run invokeThe script will whitelist the user and issue it a new token.
Next Steps
Voila! You have deployed a custom ERC721 contract with a few REST API calls 🎉🎉. Your custom ERC721 contract now supports zero-friction and gasless blockchain transactions for you and your end users.
Updated 8 months ago

