Create your first Lambda
Do you wish to build your blockchain application without learning about underlying complexities? Then you are at the right place.
Setting up everything from scratch? We have done it for you, so you don't have to.
Building a blockchain application from scratch has always been a cumbersome task for developers as there are many complexities like gas fees, nonce, transaction status, etc. But with MetaKeep’s Lambda Infrastructure, developers now don't need to worry much about the underlying complexities as all of them are taken care of by MetaKeep Lambda.
Developers can provide their custom smart contract to the platform, and the rest MetaKeep would assure. To understand more about it, in the upcoming section, we will discuss all the primary steps developers would need to follow to leverage this API.
Getting started with MetaKeep Lambda
The first step is to get an API key. To do so, sign up here.
In this tutorial, we will start with the basic Voting Smart contract from our GitHub repo.
You can find an end-to-end working demo here.
Step 1: Inherit the MetaKeep Lambda’s Base contracts to your tailor-made contract.
The MetaKeep Lambda’s Base contracts consist of the logic for handling the function calls and transactions to your tailor-made contract. You need to follow these steps here to make it work with your smart contract:
- Install MetaKeep Lambda middleware contracts and inherit
MetaKeepLambda.sol
npm install metakeep-lambda- Update Constructor: The smart contract has two constructor parameters you need to provide, lambdaOwner and lambdaName. LambdaOwner is the developer's address that one can get from using the getDeveloperWallet API.
- Add
_msgSender()function. This function ensures that we read the correct sender for meta transactions. - Replace
msg.senderwith_msgSender() - Use
onlyMetaKeepLambdaOwnermodifier to guard access to functions that only the contract owner should be able to call.
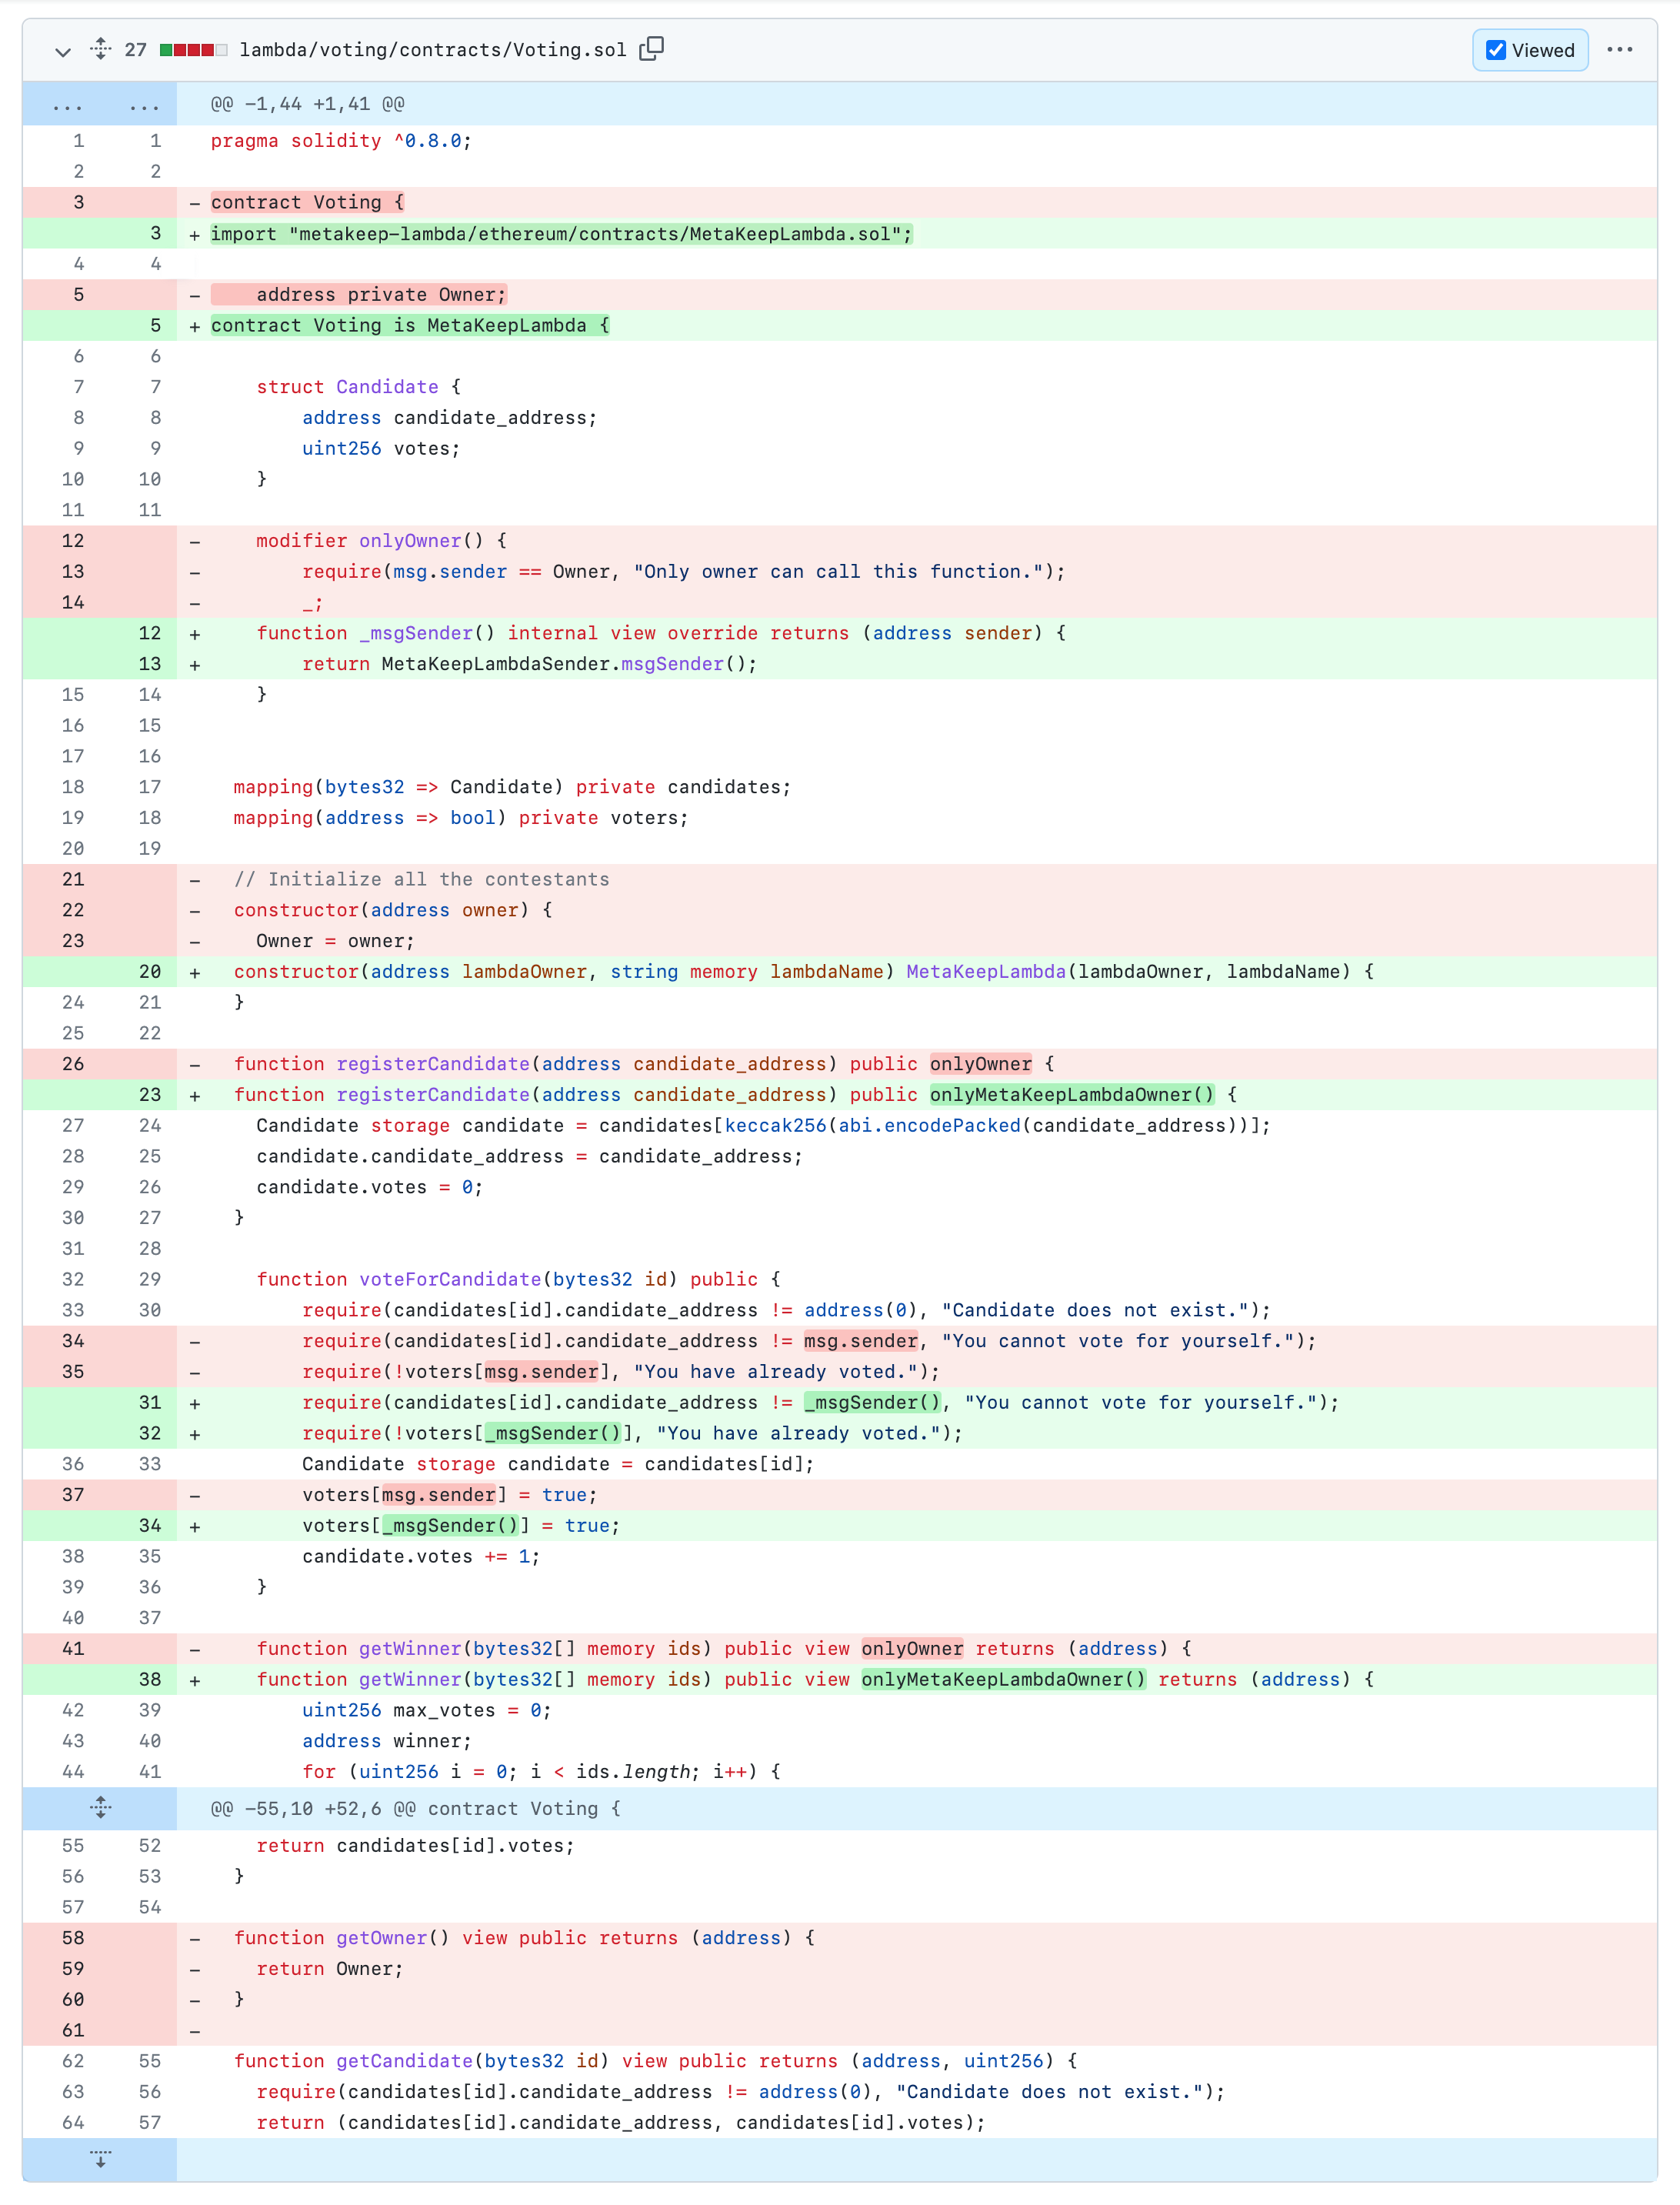
Below is a small example of how the voting contract was modified to accomplish this. After these minor updates, all of your own smart contracts will run as first-class citizens on MetaKeep, receiving the same privileges our first-party contracts do(NFT and Coin contracts), in terms of the ability to scale (to ~65K peak TPS), resiliency (AI-powered transaction failure recovery, Probabilistic gas price management) and without gas fee (for you, your customers, and their users)- i.e., deferred billing
Click the image below to see the actual code on GitHub.
Step 2: Get the ABI, bytecode, and the Constructor Arguments of your smart contract.
Once you have compiled the contract, a new folder, “artifacts,” will be created from which you can fetch the ABI and Bytecode of your smart contract.
Step 3: Create A POST request to the API.
Let's construct the request body using all the information from the previous step, as shown below.
{
	"constructor" : { args : [lambdaOwner, lambdaName] },
	"abi" : < ABI >,
	"bytecode" : <Bytecode>
}
Step 4: Call create API to deploy your contract.
To deploy your contract, make a POST request to the API. For this, you would require an API Key and an Idempotency Key. Here's how you would make a request to API.
const fetch = require('node-fetch');

const url = 'https://api.metakeep.xyz/v2/app/lambda/create';
const request_body = {
	"constructor" : { args : [lambdaOwner, lambdaName]},
	"abi" : < ABI >,
	"bytecode" : <Bytecode>

}
const options = {
  method: 'POST',
  headers: {
	Accept: 'application/json',
	'Content-Type': 'application/json',
	'x-api-key': <API_KEY>,
      ‘Idempotency-Key’: <IDEMPOTENCY_KEY>
  },
  body: JSON.stringify(request_body)
};

fetch(url, options)
  .then(res => res.json())
  .then(json => console.log(json))
  .catch(err => console.error('error:' + err));
This is what you should see as the response from create API
{
  status: 'QUEUED',
  transactionId: '1f424819-4ddc-4bcb-9054-ca75b2719f9b',
  transactionHash: '0x9b304e368e0d5d6398c6dd6ad5e216bfc80fefebb99897e8238633ef1d957b7a',
  transactionChainScanUrl: 'https://mumbai.polygonscan.com/tx/0x9b304e368e0d5d6398c6dd6ad5e216bfc80fefebb99897e8238633ef1d957b7a',
  lambda: '0x17192E38Db788a15432149C93101C6cB040dE7C2'
}
Note the lambda field in the responseThe
lambdafield gives you the address of your smart contract. Ensure that you keep the address recorded because it will be used for lambda invocation (You can always get the list of your deployed lambdas using the list lambdas API).
Running the Demo
You can find the end-to-end working demo here. Follow these steps to run the demo:
Step 1: Compile the contract
Navigate to the lambda/voting/smart-contracts directory. Then, run the command:
npm install
npx hardhat compile
Step 2: Update .env file
Update the API key in the .env file.
Step 3: Run the script
Navigate to the lambda/voting/scripts directory. Then, run the command:
npm install
npm run create
The demo will deploy the lambda, and wait for the transaction mining. You will see the created lambda address in the output of the script.
Next steps
Voila! You have deployed your first smart contract with one REST API Request 🎉🎉.
You know now how to deploy a custom-made smart contract on a Polygon chain, all through a simple API. But there is much more to discuss in the upcoming tutorials, like how to make function calls to your smart contract. Further, you can use these building blocks to build your blockchain application.
Updated 8 months ago

