Invoke Lambda method as end-user (Zero-Friction and Gasless)
In the previous parts, we tried the powerful MetaKeep APIs to create a new Lambda and invoke a Lambda method as you (the developer). However, the Lamba Invocation for end-users works differently and leverages the MetaKeep SDK to support gasless transactions for non-custodial end-user wallets. In this tutorial, we will look into how to integrate the MetaKeep SDK for any custom blockchain application and enable scalable and gasless transactions for the end-users.
User wallets are non-custodialOnly the wallet owner can perform operations on the wallet. MetaKeep and developers can't touch user wallets.
In this tutorial, like earlier, we will start with the basic Voting Smart contract from our GitHub repo.
You can find an end-to-end working demo here.
Generate Consent Token
Consent token generation happens in the backend.Consent token generation requires your API key. Never expose your secrets/keys to the public.
When a lambda invocation is requested on behalf of a user, you get back a Consent Token- looks like a base64 string. This needs to be signed by the user before the invocation can happen. The token also gives MetaKeep the approval to pay for the transaction gas fees and bill you(the developer) later.
Users don't pay gas fee.MetaKeep provides zero-friction gasless lambda invocations.
Behind the scenes, Consent Token is a cryptographic challenge generated directly by MetaKeep's hardware root of trust, based on non-custodial Private Key Management (ncPKM) infra, which can be satisfied exclusively by the cryptographic proof of identity of the end-user.
Step 1: Create A POST request to the API
{
    "function" : {
      "name" : "Name of the function >",
      "args" : []
    },
    "lambda" : "< lambda_address >",
    "reason" : "Reason for invocation. This is shown to the end users during approval process",
    "as" : {
      "email" : "<Email of User who will be invoking the lambda method.>"
    }
}
Step 2: Make a Post Request to lambda/invoke API.
lambda/invoke API.To invoke a method from the deployed Lambda contract, make a POST request to the API. Ensure that you use the same API key that you used for creating the Lambda.
const fetch = require('node-fetch');

const url = 'https://api.metakeep.xyz/v2/app/lambda/invoke’;
const request_body = {
    "function" : {
      "name" < Name of the function >,
      "args" : [] //keep it empty in case of no args
    },
    "lambda" : < lambda_address >,
    "reason" : <Reason for Invocation>,
    "as" : {"email" : <Email of User>}
}
const options = {
  method: 'POST',
  headers: {
    Accept: 'application/json',
    'Content-Type': 'application/json',
    'x-api-key': <API_KEY>,
    'Idempotency-Key': <IDEMPOTENCY_KEY>
  },
  body: JSON.stringify(request_body)
};

fetch(url, options)
  .then(res => res.json())
  .then(json => console.log(json))
  .catch(err => console.error('error:' + err));
On successful request, you will get a Consent Token in the response.
{
   "status": "USER_CONSENT_NEEDED",
   "consentToken": "CrgBAQIDAHjkSP_5liFU1kRiwcsjaYhL70lMH28zlSAGMUGu-qcyhwFlzokiZCBBJXIGos8D3l02AAAAfjB8BgkqhkiG9w0BBwagbzBtAgEAMGgGCSqGSIb3DQEHATAeBglghkgBZQMEAS4wEQQMFqkScqTlO68uvf6-AgEQgDvbTbd4sVsiGC9kpvrQcvRdl0LMFiVmg0K0eHZnlYm1M1mMyOV4X99ONhwBF3DHbtEcHs_Hfpg9AtHdExK1AgoM6uVs1U4BA3NKsVb5EqQCOPEYB6rgp_v5U-K71Rm7g1bbPhLKchRonB2teGsr7mi3tsENX0pm4fRn8al8EbeHmiSQCtvK-qAFr6SMYHW9wkc3_HBmrYYz6NbZpmie8xn3UllEy7YyWHEh7nRCajXKF79j3k-DOsdoWUe58ML_blzpicwcsNB358A7pIe6-hBn4XNL5wll_UXJEQBmDAPLp650CXmINwJWawWnQo3Jj4neTtNzXepLIWmJXRX1oW-hMyYq6Ng5oWxdkuCTqRnhRTxD5esADlbzArq8RZkM4lcPX2uNhcxAvMVS9sEhTVeFHTsuXKS-b1y-e7g5FKfe-5_lDdN-tX76LttLBWAbp05HFv5cXsAMDvI4y7_zVDQ0zDmKu4InZ_zgfJuwTh5faX98Sg=="
}
Step3: Get the User's Approval
Once you have the consent token, use the SDK to get the user's approval for Lambda invocation.
const consent = await sdk.getConsent(consentToken);Running the Demo Application.
You can find the end-to-end working demo here. Follow these steps to get the demo running:
Step 1: Prerequisite
Before proceeding, you must finish the first part of the tutorial Create your First Lambda. Once you have the Lambda contract address, store it somewhere because we would need that later.
Step 2: Update the .env file.
Update the .env file with the API key and the Lambda address you got in the first step.
Step 3: Start the backend server.
Navigate to the lambda/voting/backend directory. Then, start the server.
npm install
npm run start
This will start the server at port number 3001. This server will allow you to register a new candidate and allow your end-users to vote for the registered candidate using the consent token flow without paying any gas fees and having to create a new account.
Step 4: Start frontend
Open a new terminal window, navigate to the lambda/voting/frontend directory, and run the following command.
npm install
npm run start
This will open the demo application in your browser.
Step 5: Register a new candidate
Before you ask your users to vote, you need to register the candidate else; the vote will fail.
Tap the Register Candidate button in the header and enter the email of the candidate you would like to register.
Ideally in production, only your admins will have access to this page.

Register a new candidate
After you click Register, MetaKeep will add the transaction to the queue.
Transaction details for candidate registration
Ensure that the transaction is successful using MetaKeep's Transaction Status API or checking on the Transaction Chain Scan URL.
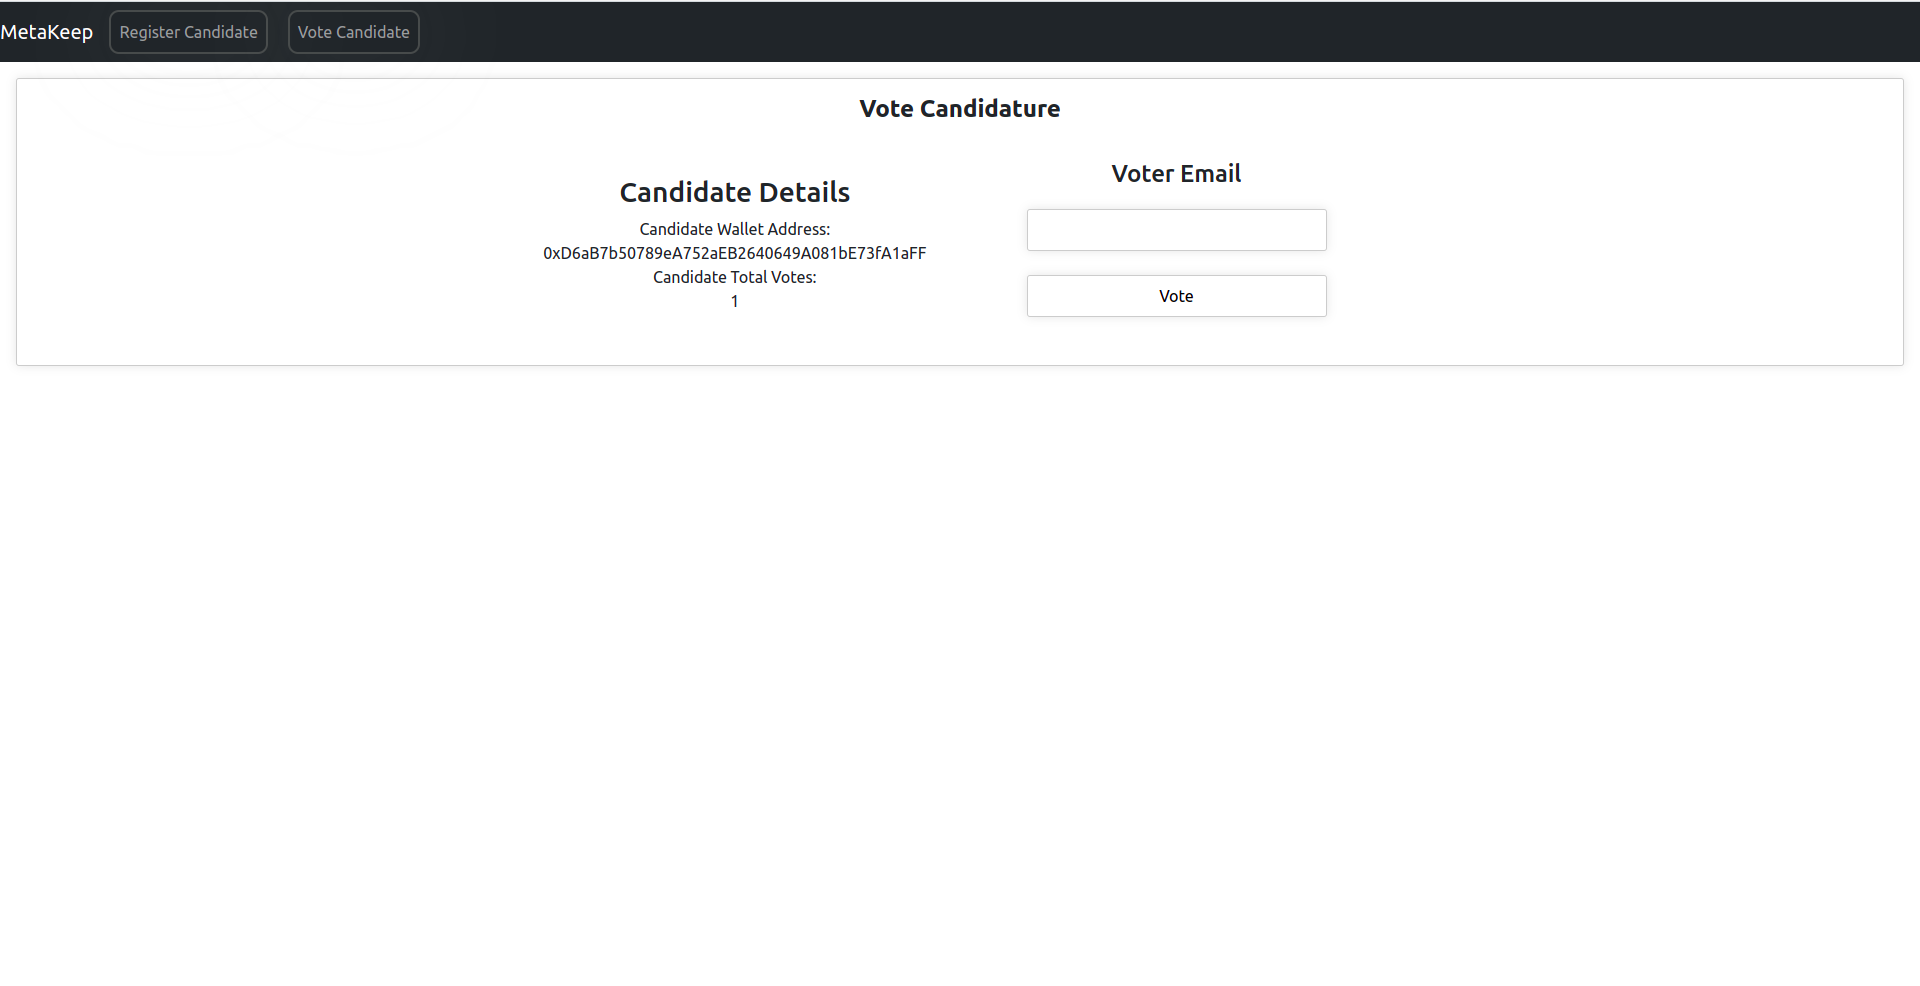
Step 6: Get the Details of the registered candidate!
Tap the Vote Candidate button in the header, enter the candidate's email and tap the Get Candidate button. You will be able to see how many votes the candidate has received so far.

Get registered candidate details
Step 7: Enter the email from which you want to vote and click Vote
The backend will generate a Consent Token and the frontend will ask for the user's approval using the MetaKeep SDK.
Step 8: Approve the vote
For verification, MetaKeep will send an OTP to the user's email. Copy the OTP and paste it into the approval UI.

User approval UI from MetaKeep SDK

User verification UI.
Once the verification succeeds, MetaKeep will queue a new transaction to a blockchain for Lambda invocation.

Lambda Invocation Queued
After you close the window, you can view the transaction details below.

Transaction Details
MetaKeep, behind the scenes, employs several strategies to ensure transaction succeeds and at the lowest cost. To get your transaction's status, you can also use the Transaction Status API.
Next Steps
Congratulations🎉🎉🎉🎉!!!! You have now enabled zero-friction and gasless blockchain application transactions for your end-users.
Updated about 1 year ago